Pumpkin Carving Ideas
Pumpkin carving ideas turn a plain pumpkin into a glowing jack-o’-lantern. Use the stencil maker to mix eyes, nose and mouth, see the carving difficulty and time, then print a stencil to tape onto your pumpkin. Simple shapes keep the cutting manageable.
Craft calendar
The site colors change with the season. Start each project a few weeks ahead so supplies and time are ready.
| Holiday | Date | Start crafting | Ideas |
|---|---|---|---|
| Valentine’s Day | Feb 14 | Late January | Valentine boxes, cards, paper hearts |
| Easter and spring | Spring | Early March | Egg decorating, wreaths, paper flowers |
| Fourth of July | Jul 4 | Mid June | Flags, bunting, star garlands |
| Halloween | Oct 31 | Early October | Pumpkin carving and painting, window silhouettes |
| Thanksgiving | Fourth Thursday of November | Early November | Place cards, leaf garlands, centerpieces |
| Christmas | Dec 25 | Late November | Trees, gingerbread houses, door decor, elf pranks |
Projects
Each project page opens with a tool or printable, then adds ideas, materials and tips. Cards without a link are scheduled and get their link when the page goes live.
- HalloweenPumpkin carving ideasScheduled
- HalloweenPumpkin painting ideasScheduled
- ChristmasFunny Elf on the Shelf ideasScheduled
- ChristmasChristmas tree decorating ideasScheduled
- ChristmasGingerbread house ideasScheduled
- ChristmasChristmas door decorating ideasScheduled
- Valentine’s DayValentine box ideasScheduled
How to carve a pumpkin step by step
- Choose a pumpkin with a flat bottom, a sturdy stem and a smooth face, free of soft spots.
- Cut the lid at a slight angle toward the center so it does not fall in. Cutting from the back keeps the stem side tidy.
- Scoop it out and scrape the wall where you will carve until it is thin enough to cut easily. Thinner walls also glow brighter.
- Transfer the stencil. Tape the printed pattern flat, then poke holes along the lines with a pin or poking tool.
- Carve from the middle outward with short, steady strokes. Cut the small details first and the big shapes last.
- Light it with an LED tea light or battery lamp.
Tools and what they do
| Tool | Used for | Tip |
|---|---|---|
| Serrated pumpkin saw | Lid and face cuts | Saw gently; do not force it |
| Scoop or spoon | Clearing seeds and pulp | Scrape the carving wall thinner |
| Poking tool or pin | Transferring the stencil | Keep dots close together |
| Marker | Joining the dots | Wipe mistakes with a damp cloth |
| LED light | Lighting the pumpkin | Safer than an open flame |
How the difficulty score works
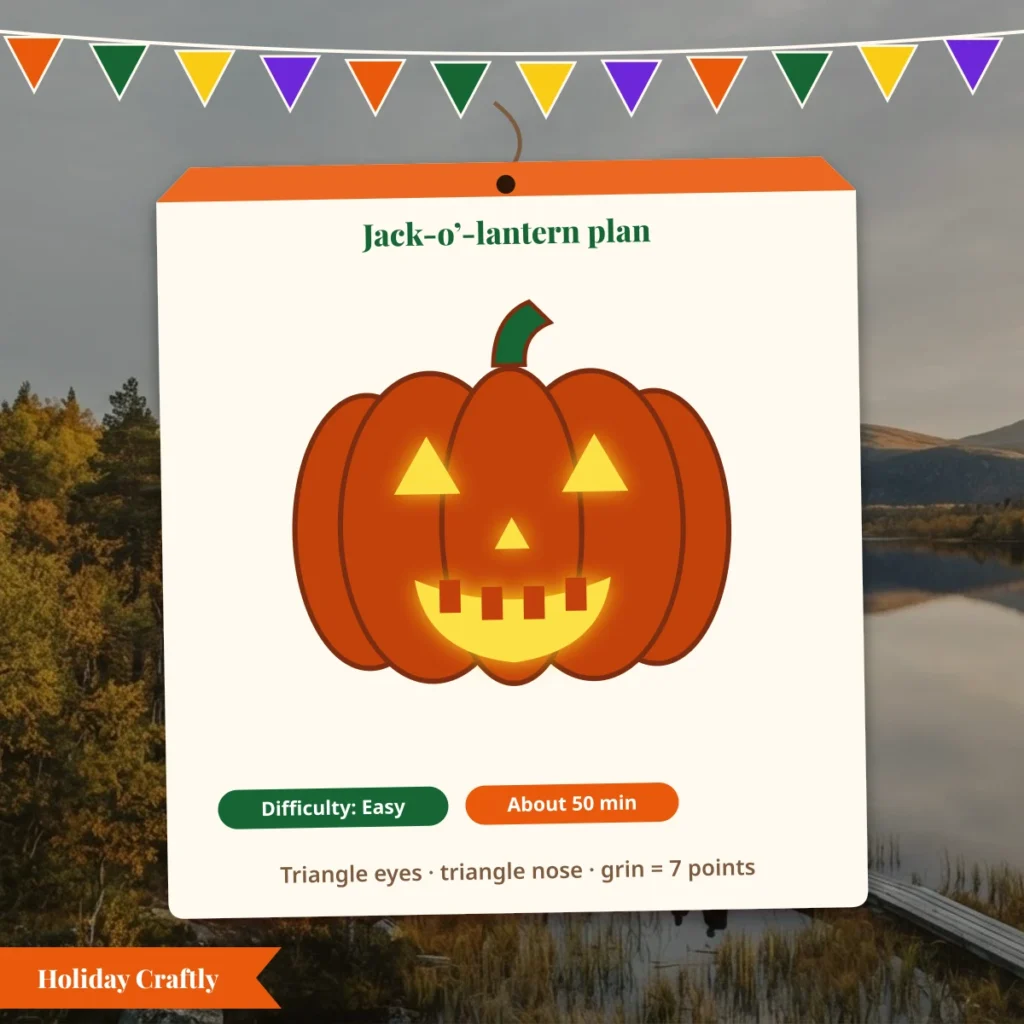
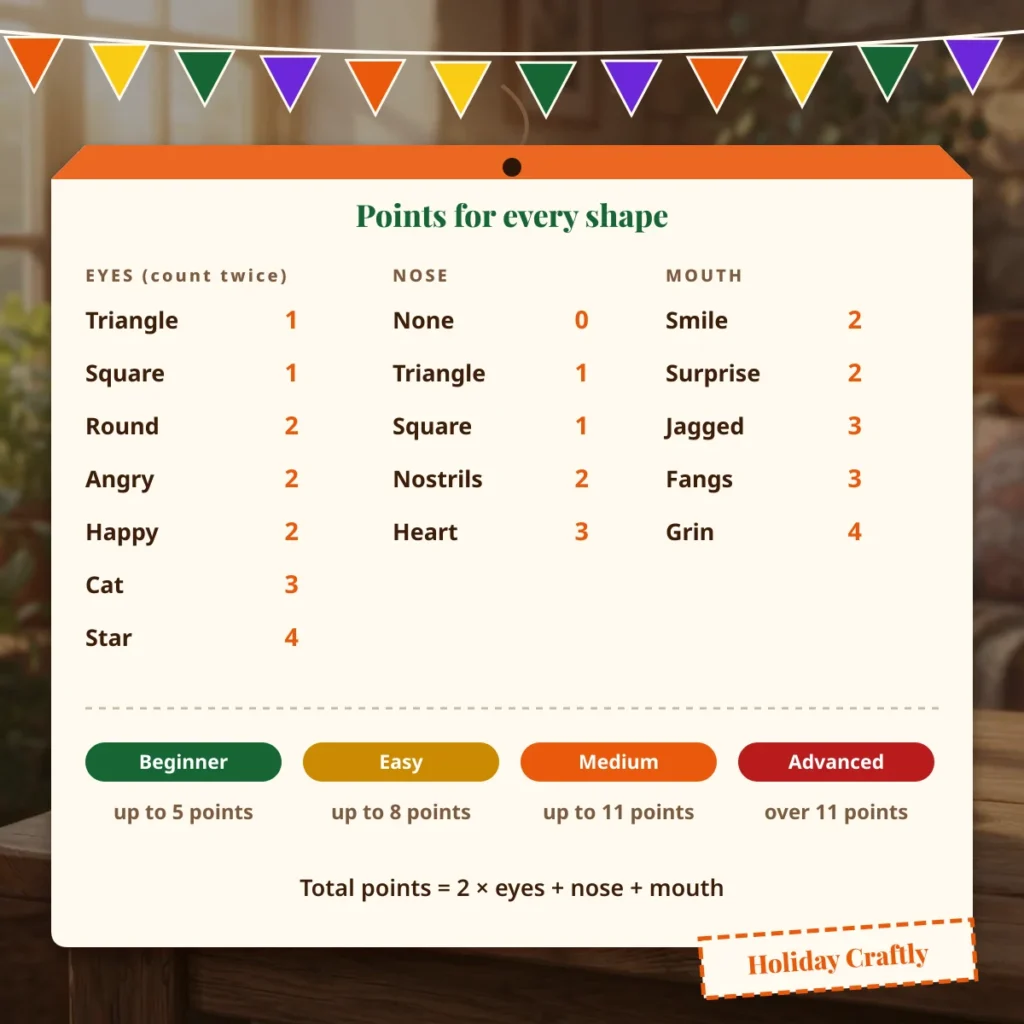
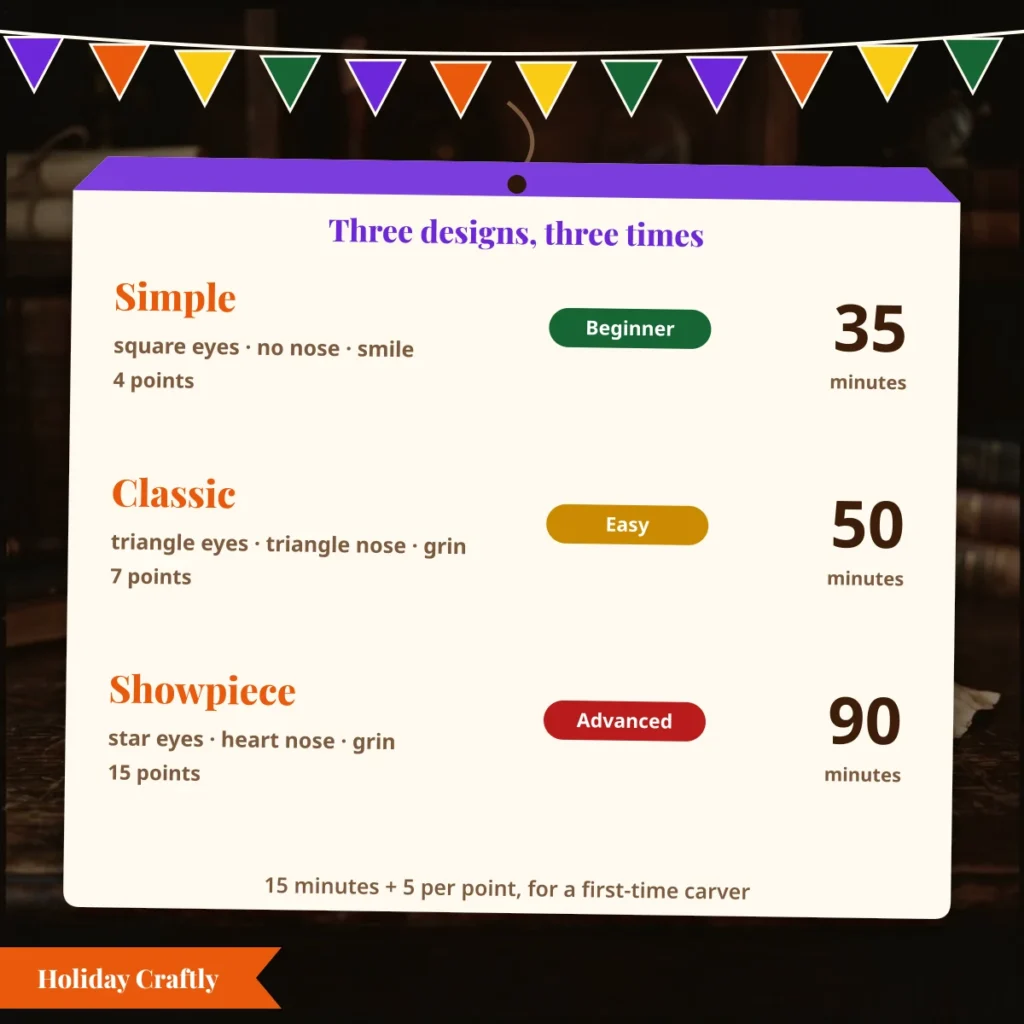
Round, square and triangle shapes are the easiest because the cuts are short and straight. Curved, pointed and toothy shapes need more turns. The maker adds up a complexity score of 1 to 4 for each eye, nose and mouth: beginner up to 5 points, easy up to 8, medium up to 11 and advanced above that. Time is estimated as 15 minutes plus 5 minutes per point for a first-time carver.
Tips for a pumpkin that lasts
- Carve close to the day you show the pumpkin and keep it cool.
- Some carvers rub petroleum jelly on cut edges to slow drying.
- Use a battery light, which gives off no heat.
- Leave wide bridges between cut areas so thin pieces do not snap.
Frequently asked questions
How far ahead should I carve a pumpkin?
A carved pumpkin lasts several days, roughly three to ten depending on the weather, and cool air helps. Many guides suggest carving within about a week of Halloween and closer to the day in warm weather. Keep it out of direct sun, and paint or decorate uncarved pumpkins earlier.
What tools do I need?
A small serrated pumpkin saw, a scoop, a poking tool or pushpin, tape, a marker and a bowl for seeds. Kitchen knives are harder to control and more likely to slip.
How do I transfer a stencil to a pumpkin?
Print the stencil, trim it, tape it flat to the pumpkin (snip the edges so it curves), then poke small holes along every line. Remove the paper and join the dots with a marker before you cut.
Is a battery light safer than a candle?
Yes. LED lights do not heat the pumpkin or start fires, and they last for days. If you use a real candle, keep the pumpkin on a stable, non-flammable surface and never leave it unattended.
How are the difficulty and time estimated?
Each eye, nose and mouth shape has a complexity score from 1 to 4. The total sets the level and the time is estimated as 15 minutes plus 5 minutes per point for a first-time carver. It is a guide, not a promise.
Can kids carve pumpkins?
Children can draw the design, scoop the seeds and decorate with markers or paint. An adult should do the cutting.
Did this project work for you?
Tell us what you loved or what we should tweak.
Thank you! Your note is wrapped and delivered.